Creating Crew & Equipment Alerts
How to Create Alerts
Keep your crews cutting and rest easy with instant alerts. Set up alerts to be delivered on on your phone, tablet or by email. As noted in our guide on Alert Overviews and Types there are two levels of alerts, Crew and Equipment.
Note: It also possible to create alerts for your customers which will be covered in more detail in Customer Alerts
This guide will walk through the steps needed to create alert at the crew level in InfoHub™.
1. From the Dashboard, choose a crew from the Group List by selecting the group name.
If there are no current alerts set up for this crew, a notice will appear at the bottom of the page asking to configure alerts for this group.
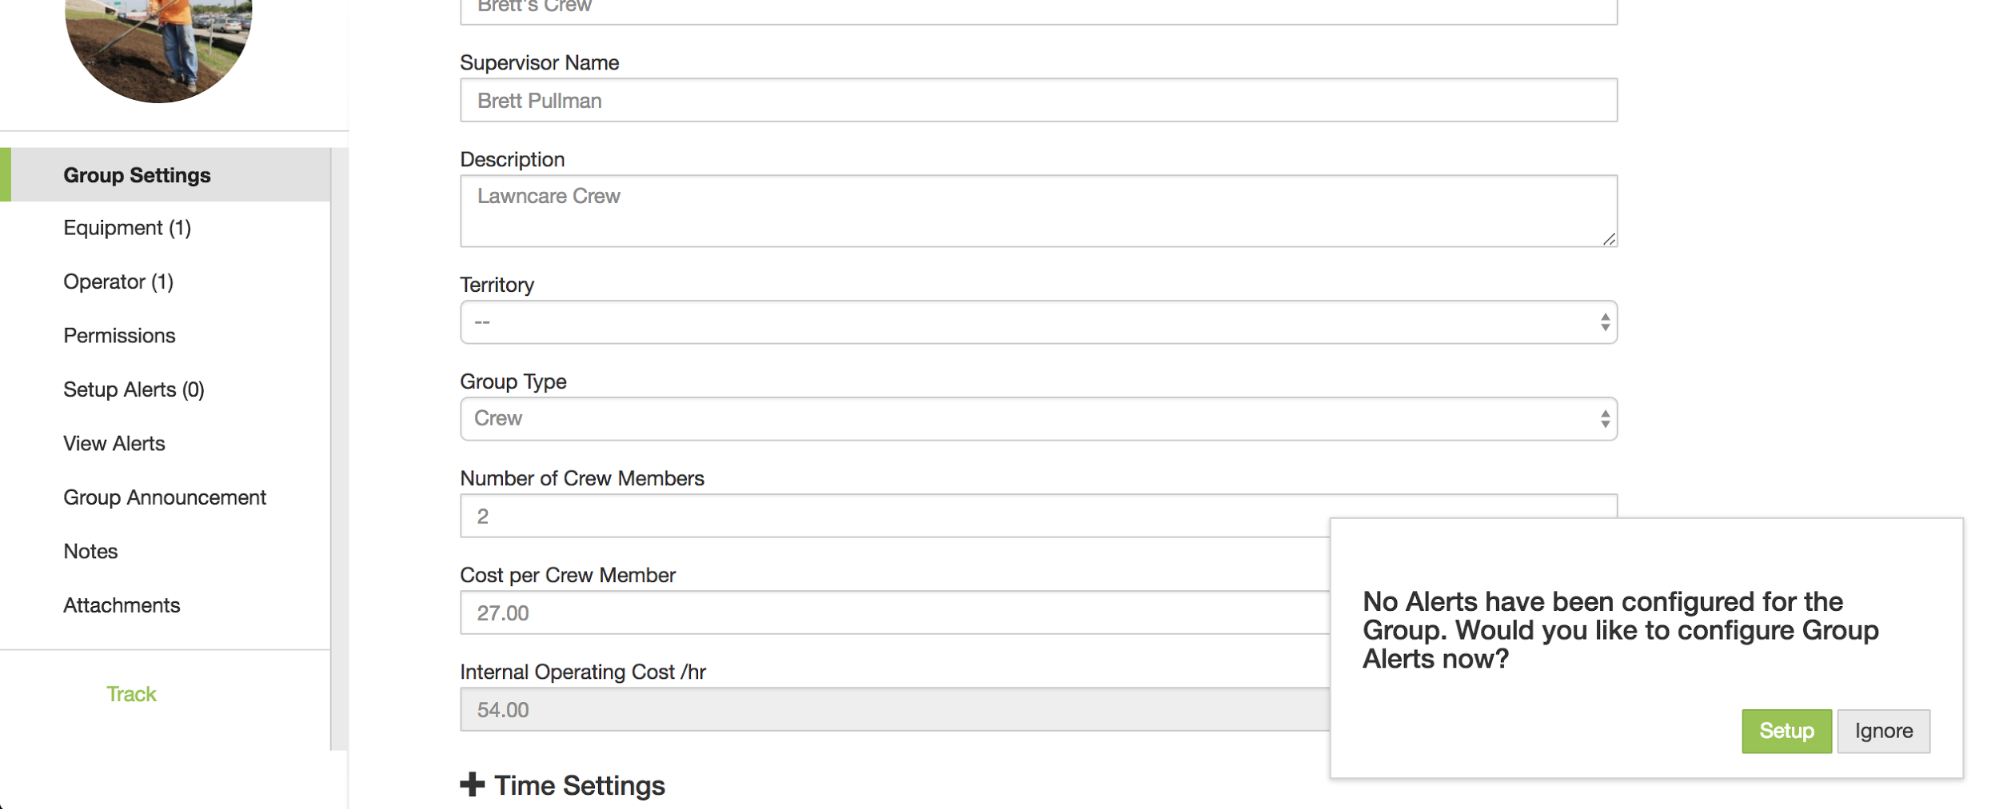
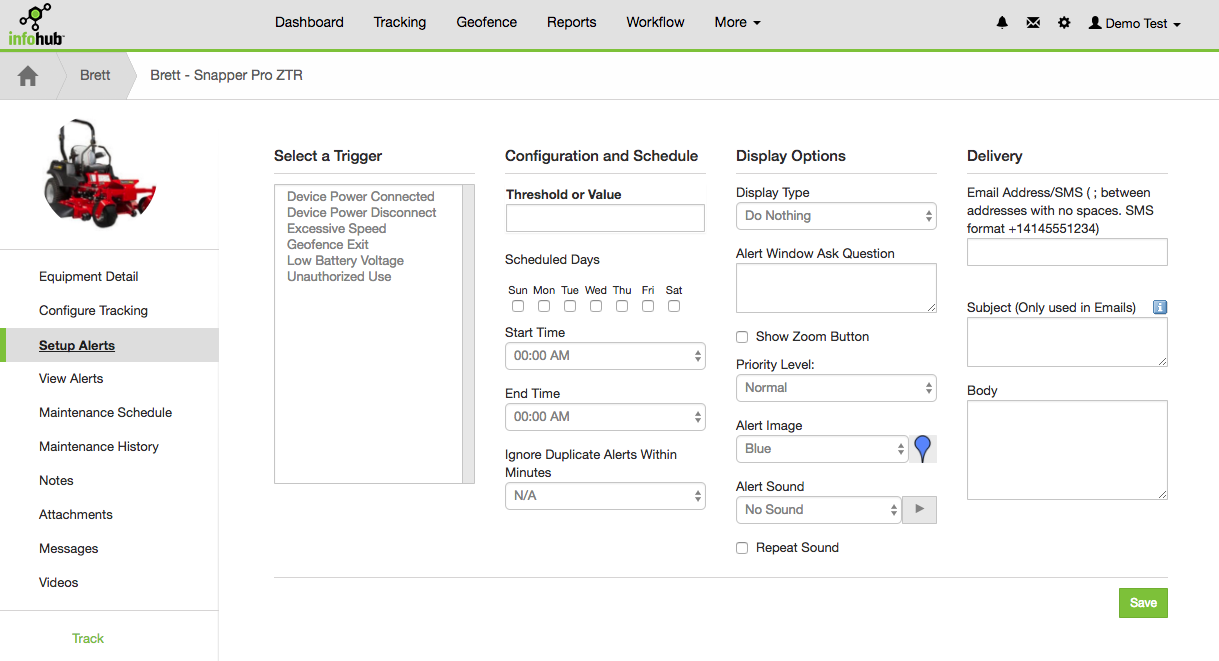
2. Choose Setup from the popup window or select Setup Alerts from the group editor Detail menu.
Alert Setup: Trigger and Configuration
The alert setup process begins with selecting a trigger.
Set the desired Configuration and Schedule. Based on the trigger selected, the options in Configuration and Schedule will change as noted below:
Device Power Connected:
Scheduled Days, Start Time, End Time, Ignore Duplicate Alerts Within Minutes
Device Power Disconnected:
Scheduled Days, Start Time, End Time, Ignore Duplicate Alerts Within Minutes
Excessive Speed:
Threshold or Value (miles) Scheduled Days, Start Time, End Time, Ignore Duplicate Alerts Within Minutes

For this alert, “threshold” refers to the speed at which this alert is triggered. For example: a threshold of 50 will trigger this alert whenever the telematics tracking device detects speeds at or above 50 miles per hour. Local ordinances and traffic laws should be followed at all times.
Geofence Exit:
Scheduled Days, Start Time, End Time, Ignore Duplicate Alerts Within Minutes
Low Battery Voltage:
Threshold or Value, Scheduled Days, Start Time, End Time, Ignore Duplicate Alerts Within Minutes
For this alert “threshold” refers to the voltage within the equipment battery. For example: a threshold of 10.5 will trigger this alert whenever the battery operates at or below 10.5 volts.
Unauthorized Use:
Authorized Days, Scheduled Days, Start Time, End Time, Ignore Duplicate Alerts Within Minutes
Authorized Days refers to the time period in which use is permitted.
Scheduled Days are the days when this alert will be monitored and triggered.
For example: To set an alert for unauthorized use on the weekends at any time, set the Authorized Days to be Monday-Friday and Start Time to 00:00 AM and End Time to 11:59 PM. Set Scheduled Days to be Saturday and Sunday from 00:00 AM to 11:59 PM.
To see what the different alert types mean, see our guide on Alert Overview & Types.
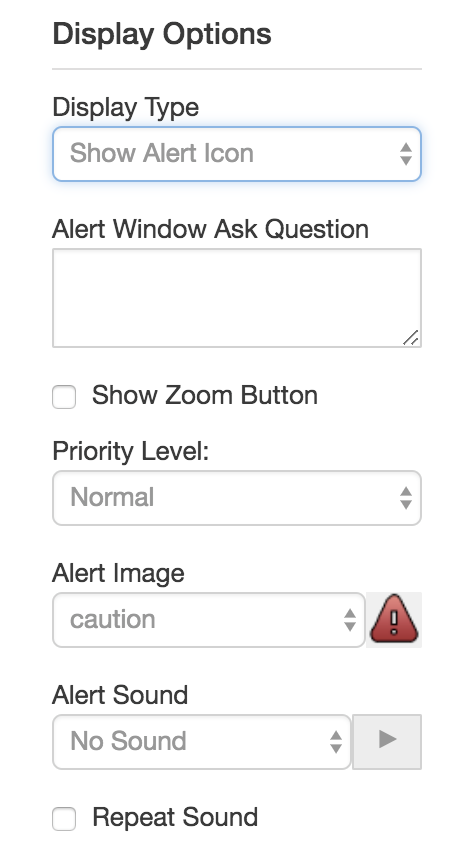
Display Options
Set the Display Options for this alert. There are several settings within this section.
As a rule, alerts will always be visible from:
Dashboard - Recent Alerts
Tracking - Session Popup - Alert Tab
Tracking - Session Popup - Location Tab
Display Types
Do Nothing
Turns off the alert icon on the map. (You will still be able to see this alert within the noted areas of Dashboard and Tracking)
Show Alert Icon
Alert will show as an icon within Tracking and as a number next to the icon within the Utilities Menu of the Navigation Bar. ![]()
Show Message Icon
Alert will show as an icon within Tracking and as a number next to the badge within the Utilities Menu of the Navigation Bar.
and
Alert will show on the Dashboard within your session summary (if checked.) It will also appear in popups with required acknowledgement.
Show Alert Optional Response
All notifications will be visible. Enables acknowledgment for alerts with optional response
Show Alert Required Response
All notifications will be visible. Enables acknowledgment for alerts with required response
Show Zoom button
When checked, the Show Zoom button enables the zoom function on the Tracking map when Optional or Required Alert Response is set.
Priority Level
Set the priority level to “High” to move this alert to the top of the list when the Display Type is Optional or Required Response.
Setting priority level to high will also display this alert at the top of the list in the Recent Alerts section of the Dashboard.
Alert Sound
Plays selected sound from available list when the Display Type is Optional or Required Response. Check the Repeat Sound box to loops the audio instead of only playing one time.
Delivery
Delivery allows you to send an email and/or text alert to any device, whether it is a mobile phone, tablet or work computer.
Type the email address(es) that you wish to send this alert notification to. Note: Include a semicolon (;) to include multiple addresses. Ex. tom.brady@gmail.com;will.brady@gmail.com

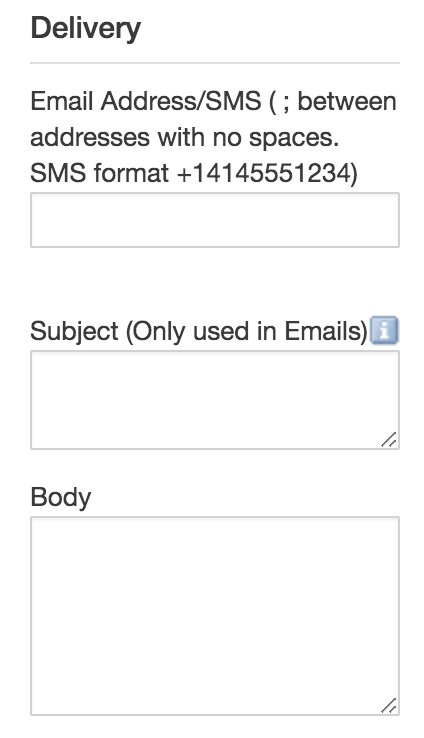
To send a text message: Use SMS format +14145551234
Set the Subject (Email Only) and Body for your alert message. There are a number of functions you can use when entering the details of an instant alert message. Refer to the Tag Description List for available functional tags and their use.
Note: The Tag Description List is also available within InfoHub by selecting info ![]() next to the Subject field. SMS messaging has a character limit of 150 characters and it this limit is exceeded, the message will get broken down and sent in multiple messages.
next to the Subject field. SMS messaging has a character limit of 150 characters and it this limit is exceeded, the message will get broken down and sent in multiple messages.
When you have finished entering Delivery options for an alert, select Save.
Within the trigger list, items with an asterisk (*) next to the name represent the alerts that have been set up. You may need to refresh the page in order to see a recently added alert in the list.
Equipment Level Alerts
The process of creating equipment level alerts is the same, To create an equipment alert:
1. View the equipment details of the individual machine.
2. Select Setup Alerts from the Equipment Detail menu.
3. Follow the steps to Select a Trigger, Configuration and Schedule, Display Options and Delivery.
4. Select Save.