Add Job Site Locations & Mapping
Part of adding a customer to your InfoHub™ account includes mapping the locations and service boundaries of their job sites. A single customer may have multiple job sites so these are treated as properties of a customer. You will find job site details for a customer located within their customer details.
Job Sites
Let’s walk through how to add a new Job Site to an existing customer.
- From the Dashboard, Navigate to your Customer List.
- Select a customer to view their details.
- In the left-hand detail menu for this customer, Select Job Site.


4. Choose Add Location.
5. Now you will see the Job Site Detail page. Enter the Job Site Name and select the Type. (Job Site Types are configured in Tools and Settings. See how to manage your job site types.)
6. You can also include a description of this job site if you choose. Icon, Status and Integration ID are not needed and can be left blank.
7. Enter the address of this job site. To save some time, you can check Use Billing Address if the location of this Job Site matches that of the address of your customer.
8. Save.
After saving, the screen will display more options to add about this Job Site. If you have matched your billing address to this Job Site, that information will now be displayed in the address fields.
Add a Photo
You can add a profile image for your job site locations (as well as customers, equipment and operators.) To do this:

- From the Job Site Detail page, select the profile avatar. Select Change Picture.
- In the popup window, select Choose File to upload the image you want to use.
- Use the handles on the image preview to crop the image to your liking. When you are done, hit Save to set the image.
Mapping Locations*
In the following video we walk through how to map a Job Site Location and include non-service areas and trimmable footage. Follow along with our step by step guide below.
Select Location from the left-hand detail menu.
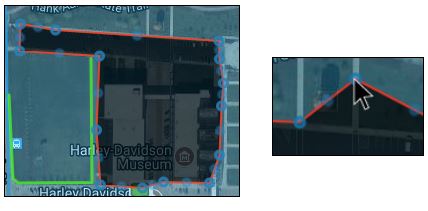
On the Job Site Location screen you will see the map of this location according to the address info you have entered.
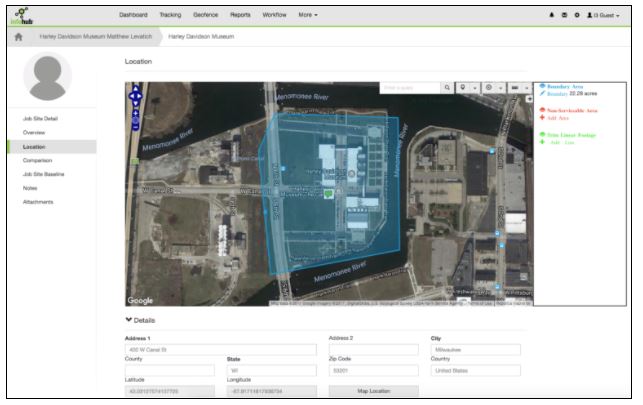
A blue field will appear on the map. This is the default boundary. When you create your own location polygon, the default boundary will be overwritten.
Note: The boundary can also be displayed from the Tracking section of InfoHub which is helpful when you are looking at historical routing data
Now it’s time to edit the boundaries of this location. Location boundary mapping is helpful to:
Know the total surface area of that job site.
Accurately account for the areas that your crews will mow versus non-serviceable areas (like buildings or parking lots).
Estimate the linear footage to trim.
Understand how long to expect for Job Site Duration and travel time.
To get the most accurate data for how much lawn area you need to service. You can customize the boundary to a more precise boundary area.
1. Move over the map area and select (Single mouse click) around the perimeter of the Job Site. A Blue field will overlay the existing boundary.

2. As you complete the shape of the property, double-click to finish and update the boundary area.
Important: The boundary is used to detect when crews arrive and depart a job site. Make sure your boundary includes the location the crew parks. As an example, if a crew normally parks on the street in front of a residence, the boundary should include the street to accurately track job site time.
3. Save your progress
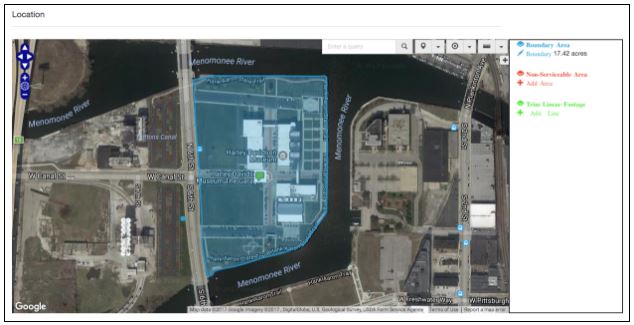
In the above image, you can see that our new service area is more accurate now.
To mark your non-serviceable area:
In every Job Site there is likely to be areas that are non-serviceable such as parking lots, buildings or other structures.
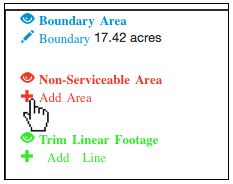
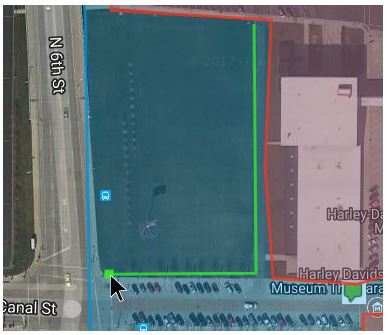
1. Select the RED Add icon from the service area menu to the right of the map
Your cursor will change to show are red dot on the map.
2. Begin selecting around the areas that you wish to exclude. It’s important to avoid overlapping non-serviceable areas.

Remember, the non-service areas are for your benefit when you assess how much land to service. Accurate Job Site maps will result in more reliable time and cost estimations for each customer and help crews be more efficient.
You can create multiple areas within a Job Site that are non-service zones. Simply select Add Area again from the menu at the right of the map.

3. Again, when you are finished marking non-serviceable areas be sure to Save.![]()
Trimmable Linear Footage
For areas that are trimmed along the edges of the property, you can see how much linear footage is needed by using the map as well. To do this:

1. Select the GREEN Add Line icon from the service area menu to the right of the map.
Your cursor will change to show are green dot. This tool does not create polygon shapes but rather a single straight edge line.
2. Draw a trim line on the map. Double-Click to end the line and record the linear footage.
3. Continue to Save your progress.
If you scroll down and look at the lower portion of the Location Editor, you will see in the Proposal section, there is now numbers entered in the fields that correspond with the area you have mapped.

Edit/Delete Polygon Areas
To modify an area of your service zone, select the pencil icon of the polygon you want to adjust.
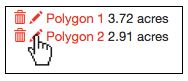
That polygon will now be selected. To move, grab one of the circular handles and drag to a new location.
At this time, it is not possible to add anchor points to your polygon. If you have overlapping bounds or want to redraw a zone, select the delete icon![]() from the service area menu of the polygon you wish to remove.
from the service area menu of the polygon you wish to remove.