Basics of Geofences
Geofences take your InfoHub system to the next level by allowing you to monitor crew activity anywhere. Use custom geofences to know when equipment enters and leaves your offices, protect against theft and ensure that operators are staying on task. The best part is that Geofences don’t need to be associated with a Customer’s Job Site.
The Geofence Tab:
Find Geofences by selecting Geofence from the Main Menu in the Navigation Bar.

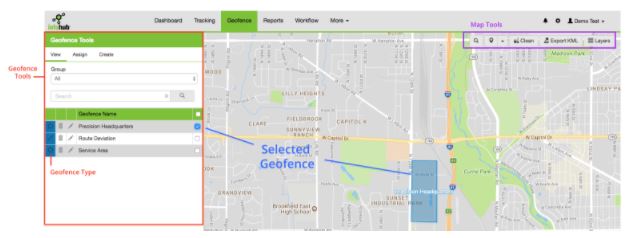
The Geofence section has a few notable areas:
Geofence Tools: The left area of the page is the control center for managing geofences. By default, The Geofence Tools is in “view” mode. It shows a list of all the created geofences for the current InfoHub account. The modes for Geofence Tools are:
View: A list of created geofences by name. The icon next to each item denotes the Type (Circle, Polygon, Route) and will change color depending on your preferences when creating a geofence, Select any Geofence checkbox to display this geofence on the map.
Assign: Choose individual equipment items or entire crew groups to report on their activity within a designated geofence.
Create: Build new geofences and search for points of interest on the map by entering an address, coordinates or by selecting an existing Job Site.
Map Tools: Within Geofence there are map tools that are also present within Tracking. The map tools displayed will change depending on which mode is selected within Geofence Tools. In all modes is the Clean
 tool. Select Clean to hide any selected Geofence on the map when in View or Assign mode. Selecting Clean while in Create mode will remove all points of a geofence that has not been saved yet.
If you have created custom Geofence zones, you can also view these by selecting ![]() from the map tools.
from the map tools.
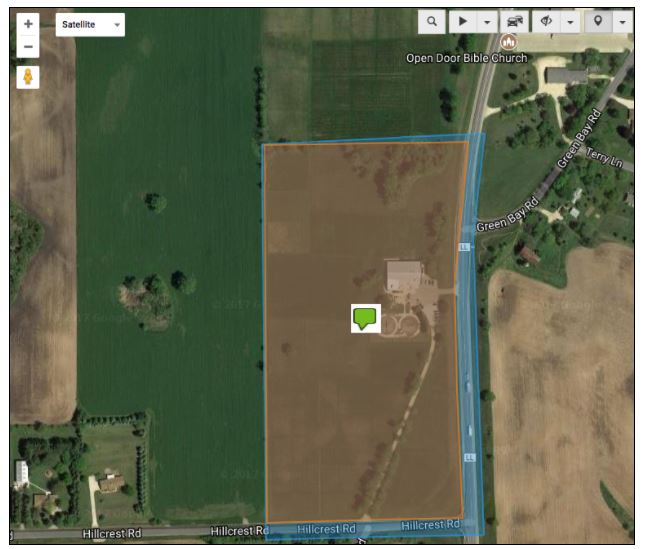
Depending on your zoom level, the geofence will appear as a blue field covering the map. You may need to zoom in or out depending on the overall size of the Geofence you are looking at.

The above image shows the difference between the automatically generated buffer and the custom Geofence. The Geofence will be picked up by your Telematics Tracking device and can be used for customer reports such as workflow arrival and departure.
Note: In order to see the Job Site polygon including non-serviceable areas and trimming, view your Job Site Location from within your Customers group.
Ready to create and assign geofences? Continue on to our next article: Create a Geofence