InfoHub™ Quick Start Guide
InfoHub is an all-in-one business solution that makes running your commercial turf business easier, smarter, and more profitable through:
- Crew and equipment tracking
- Job bidding and job site analysis
- Automated route scheduling
- Dashboard overview and real-time alerts
- Equipment maintenance tracking
- Profitability and efficiency analysis reports
These first steps will help you get started successfully managing your lawn care business in the InfoHub dashboard.
Take a few minutes to watch the Overview Video.
Your crews and equipment are critical to your success. That’s why we have designed InfoHub around monitoring equipment activity. You will want to set up the tracking devices on your lawn care equipment right away. An InfoHub Support team member will ensure that this step is done correctly.
Next, you should customize the settings to match the way you do business. Then it’s time to add more details about your operation including: customers service locations and reports to track your progress.
When you’re done, you will be on your way to better business management in no time. Log In to your account and read on to begin.
Steps to Get Started
1. Set Up Your Groups
A “group” in InfoHub represents a collection of customer or crew entities that you want to manage.
Add a group by selecting the Add Group ![]() button from the Group List in your Dashboard.
button from the Group List in your Dashboard.
The group name is the only required field but you will also want to make sure you specify the group type before you save. There will be different attributes depending on the type of groups you select (Customer or Crew).
Creating a Crew
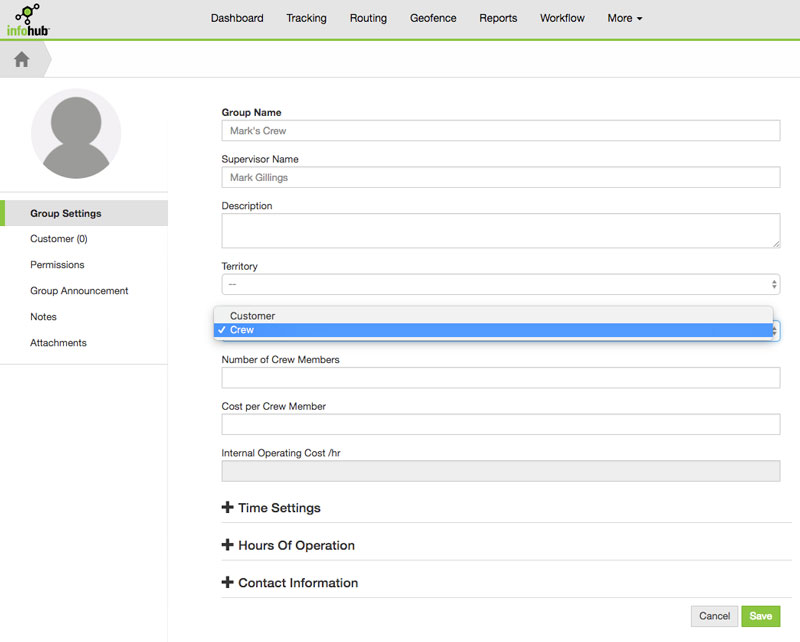
For your crews, choose a group name that will be helpful to identify the members within the group. Popular naming conventions include using the supervisor’s name or region of service.
Enter supporting details about this group and Save.
Adding Equipment
Once you save, you will see a pop-up that prompts you to set up your vehicles where you can add the equipment used within this crew. Let’s do that now.
Choose Add New from the Equipment screen and add details about your equipment. Only equipment name is required but you will want to add as much detail as needed.
Work with an InfoHub Support team member to properly set up your telematics tracking device. You can connect with a team member online or by phone. Contact our Support team here for more information.
Next Steps:
- Learn how to add equipment step by step.
- Set maintenance schedules and alerts.
Add Operators*
A crew also includes the individual members that will operate the equipment. You can add operators from within the Group Editor.
From the Dashboard choose the operators link within the crew you just added to go to the Group Editor, or if you just finished adding equipment, select the name of your crew in the upper-left corner of the page to go back to the Group Editor Screen. Go to your Operators List by selecting Operators from the menu in the left panel.
Choose Add New from the Operators screen and add details. (First and Last Name are required.) When you are finished adding information, be sure to save.
*All operators should be trained per equipment manual(s) before operating your equipment to avoid personal injury or property damage.
Next Steps:
- Learn more about adding operators.
- Read our guide about adding customers and mapping their job site locations.
2. Configure Your Settings
It’s important to set up InfoHub to suit your needs. You can configure settings for many areas of InfoHub but a few important ones to consider are adding the service types you offer and types of maintenance to track for your equipment.
To access settings:
Select the gear icon ![]() from the utilities menu of the Dashboard. Then choose Tools and Settings.
from the utilities menu of the Dashboard. Then choose Tools and Settings.
From here, you will be taken to the configurations screen.
Add Job Site Services by:
Selecting Create Job Site Types and Status from the Job Site Tools group.
On the next screen Add New Type and enter the name and description of the service.
Common job site services to include: Lawn Care, Seasonal Cleanup, and Landscaping. You can always create more specific job site types from within the customer location editor later.
Add Maintenance Types by:
Selecting Maintenance Manager from the Client Tools group.
On the next screen Add New Maintenance and enter the operation and details you want monitor
Like Job Sites, you can add new maintenance types as you add equipment to your crews.
Other things you can do from the Tools and Settings menu include:
Change map icons and other display options
Import Job Sites and Schedules, Group Settings, and Geofences
Create Proposal Templates
Subscribe to Reminders
We'll cover all of the additional configuration options in an upcoming article.
3. Use the Map Tools
InfoHub uses GPS and maps to help you manage many aspects of your commercial turf business. See the map by selecting Tracking from the Dashboard.
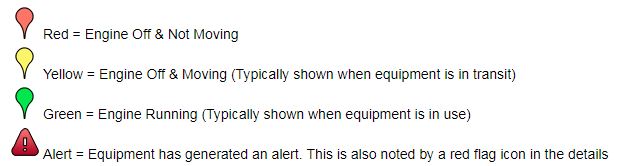
Here you will see all of your equipment and current location. You can see the current state of a machine by referencing its indicator icon in the details of the tracking tools panel.
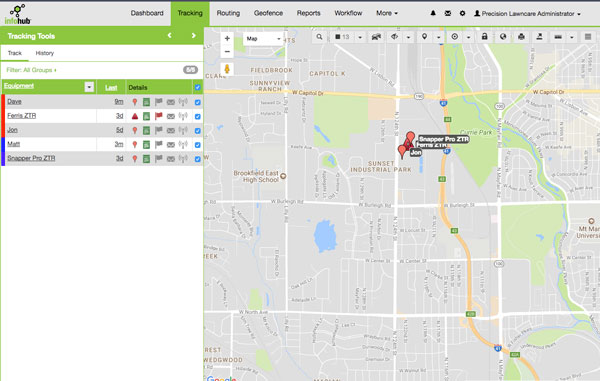
Choose Show Job Sites ![]() at the top of the map to see where your service locations are.
at the top of the map to see where your service locations are.
Choose Hide Labels (Eye icon) ![]() to toggle the labels of the equipment on the map.
to toggle the labels of the equipment on the map.
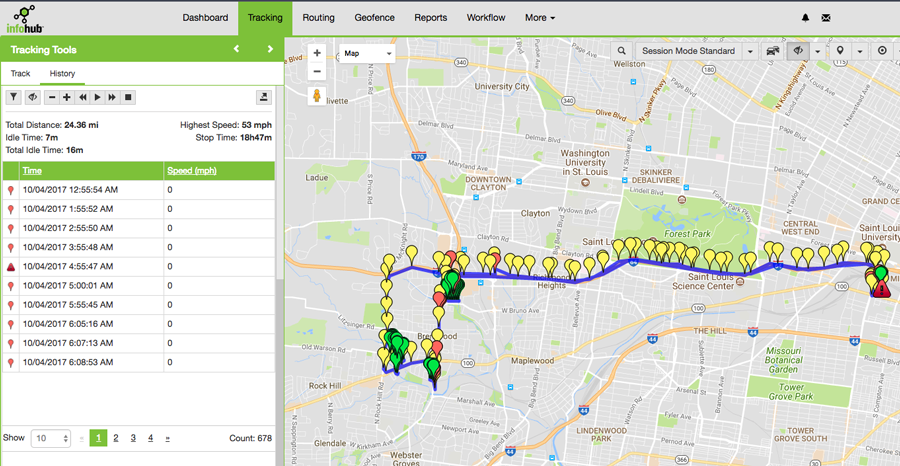
A powerful feature of the map is the ability to see the location history of a piece of equipment.
To see the history of equipment:
Choose History from the Tracking Tools panel.
Select the group and date to filter by.
Select the equipment by selecting the checkbox in the row you wish to view.
The map will show the path that equipment took and what it was doing when it reported back (running, in transit, stopped).
Visit the Tracking section of this guide for more detail about the map tools, how to review history and advanced methods for calculating routes and work for your crew.
4. Create Reports
InfoHub’s reporting tool lets you generate and view reports about your business. Access your reports by selecting Reports from the Main Menu.
The types of reports available are summarized in the table below:
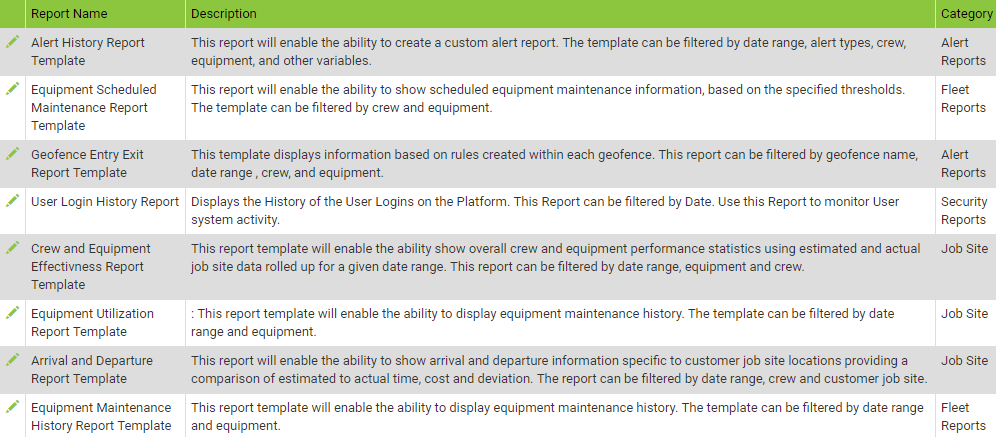
Select a report to see the information contained within that report type.
Report Templates
Every custom report you create starts as a template. It’s easy to create new templates for reports and you can also subscribe to a report to have an email sent to you about your operations.
Create a report template by:
1. Select Report Templates under the sub menu of the reports screen.
a. The available templates will be grouped by category and you can view the templates by selecting the category name.
2. Choose the report template you want by selecting it.
You will follow a 4-step process to select the options you want in this particular report template. At the final step, give your report a name and description to help you remember the unique aspects about this report.
3. Select Save and Run from the options on the final step.
4. Choose the green Finish Report button at the bottom of your screen.
Your report has been created and saved! You can now access this report at anytime in the future. A window will appear to show you what your report looks like.
For more detailed information on reports and how to schedule automatic reports through subscriptions, visit the Reports section of our support guide.
Next Steps
Read the rest of the articles in our Getting Started section - there's a lot more information in the InfoHub Support Center. Some key topics you may want to check out are:
Explore the Dashboard - A bird’s eye view into everything on the main screen of InfoHub.
Workflow Overview (Video) - See how you can create routes for your crew and see who’s on the schedule.
Proposals (Video) - Win more clients by bidding with proposals directly from InfoHub.